

Artekk use potential and key characteristics
The range of Artekk use potential is broad, include all external wall cladding, internal floor and wall linings, shower recesses, kitchen benchtops and splashbacks, vanities, and applications over existing floors or walls.
Artekk’s 100% natural material structure of more than 60% virgin materials, absence of any chemical binders or resins, and Artekk’s 1200 degrees centigrade Kiln fired origins provide Artekk sintered porcelain panels outstanding structural and durability integrity enabling;
■ High strength, scratch resistance surfaces with outstanding wear & chemical resistance, allowing ease of 100% graffiti removal without damage
■ Superior thermal shock resistance for rapid temperature change environment applications
■ Unmatched stain and mould resistance, similar to Kiln fired clay bricks and industrial glass allowing hospital grade sanitisation.

Artekk fabrication hints for highest quality outcomes
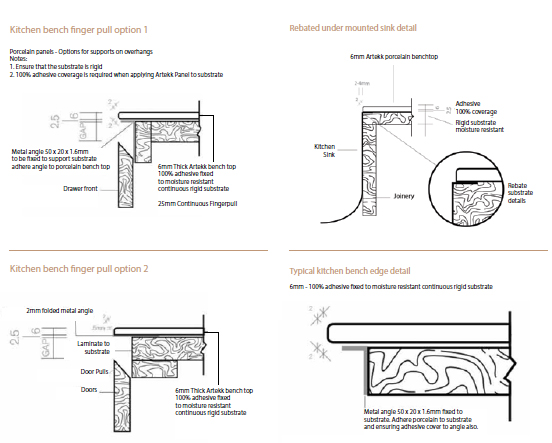
SUBSTRATES FOR COUNTER TOPS
Always use a rigid and continuous moisture resistant substrate such as CFC or FC and ensure that the substrate is rigid totally flat with no flex. Do not install Artekk panels on unleveled , unclean or flexible substrate, these are not suitable.
ADHERING ARTEKK TO SUBSTRATES AND SPLASHBACKS
When adhering Artekk panels to an existing substrate or splashback you must ensure that the adhesive spread has total coverage of at least 2-3mm thick. The adhesion space between the substrate and Artekk panels must be free of airgaps. Ensure that manufacturers curing times are adhered to before any works are performed such as core drilling, plumbing or on-site cut outs.
OVERHANGS
Artekk recommend flush finish of Artekk panel edge to benchtop joinery, 5mm overhang unsupported or maximum 20mm overhang with angle support – see drawings. If larger overhangs are required for island benchtops, use a suitable support substrate to minimise any potential damage to material due to heavy impact or flex. Substrate must be rigid, steel framing may be required to ensure rigidity.
UNDER MOUNTED SINK AND FIXING TAPS
Do not adhere sinks to underside of Artekk porcelain panels only, sink flange must be entirely supported by the substrate (see fig. ? ). All cut outs to be waterproofed and important to ensure taps are not over tightened. Taps should only be installed after the adhesive has fully cured. To avoid over tightening tap fittings - ensure that Artekk panel sits flush to edge of substrate and that the Artekk panel and substrate both support tap base and fixing.
A solution for fitting taps is to fix the tap base housing direct to substrate, which means enlarging the hole on the Artekk panel so that the tap base can be recessed (ensure that silicon is used to prevent moisture ingress). We recommend silicon to adhere sink lip (aluminum or stainless element) to Artekk panels and suitable adhesive to fix Artekk panels to substrate. Ensure that the silicon and adhesive sit at the same level and thickness
DROP-IN SINK
Ensure that Artekk panel sits flush to edge of substrate and that the Artekk panel and substrate both support sink weight.
EDGE DISTANCE TO CUT OUT
Artekk recommend a minimum 80mm to any edge, pending cook-top or sink sizes and hole for the tap, and cut out a minimum of 50mm to any edge of hole from back wall and edge of sink.
SQUARE EDGE CUT OUTS
All square and rectangular cutouts, such as for sinks, cook tops , shower niches and fireplaces must have rounded internal corners (min 10mm radius) to prevent radial cracking. Specifically where the Artekk panel might be expected to return in from one or more faces with a mitred or butt joint.
Note: It is essential that Artekk panel is always sectioned around this type of opening to avoid stress points in the Artekk panel, where subsequent movement in the structure may cause a fracture in the Artekk panel.